
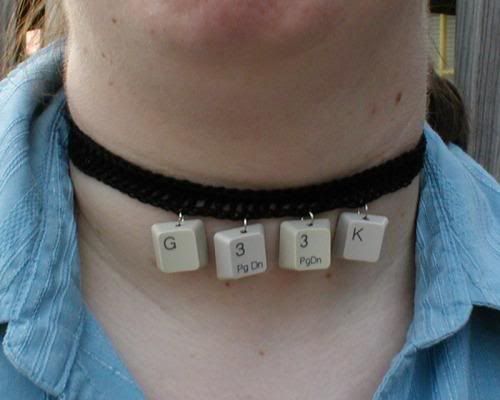
Keyboard Bracelet
MalwareBytes is GeekDrop's Favorite Anti-Malware Solution
Act now to get a huge savings on GeekDrop's favorite Backup, Imaging, & Drive Utilities. Also our member's #1 choice!

Materials:
Broken or discarded computer keyboard
Flat head screwdriver
Pliers
Candle
Small nail
Safety glasses
Dish soap
Jump rings
Dremel tool with grinding attachment (optional)
Jewelers glue (optional)
Instructions:
This recycle or up-cycle project shows you how to make a fab keyboard bracelet or you can marker larger for a anklet.
Don't throw out that broken or outdated computer keyboard, make yourself some fun accessories and re-use, recycle, and re-create!
Prepare Keyboard Keys
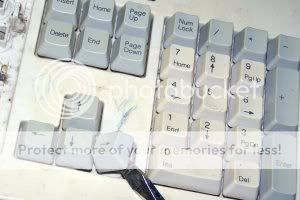
1. Begin by removing the keys from the keyboard. This is easily done on most older keyboards by prying each key upwards with a flat head screwdriver. Some of the newer keyboards use small metal spring arms and require each key to be pushed in a certain direction to be removed. If you are having trouble with your keyboard Google the brand/model and 'key removal'.
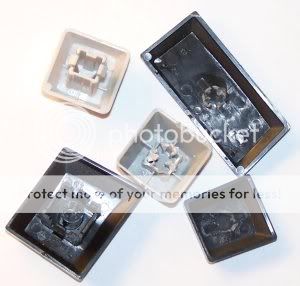
Some keys, like the ones pictured, are attached to the keyboard via four plastic pieces on the back of each key. You may or may not wish to remove them depending on their size, appearance, and how you would like them to lay or hang when being worn.
To remove the plastic pieces twist each one separately with the pliers until it snaps off. Most of the pieces should break neatly at the base but for those that don't you can use a dremel tool with a grinding attachment to quickly smooth rough edges.
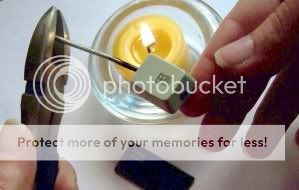
2. Next, you will need to make holes for stringing or attaching jump rings. If the keys are to be strung you will need to make a hole on each side of the key, if they are to be hung as pendants or earrings you will need to make only one hole at the top of each key.
The following step should be done outdoors or in a well ventilated area!
Don't forget to wipe the nail with a rag between each hole you make. Doing so will help ensure each hole is as clean as possible. More importantly though, it will minimize the amount of plastic you are burning, keeping this an earth-friendly recycled project!
To make each hole: Use the pliers to hold the tip of the nail in the candle flame for approximately thirty seconds then quickly pierce the key from the back side. To smooth the edges around the hole, re-heat nail and insert again starting from the front side of the key.
3.When all necessary holes have been made thoroughly wash and dry each key.
Bracelet
If using ribbon or similar stringing material that can be tied to secure rather than using a clasp, string one half of jewelry piece beads etc., add pendant, and complete by beading other half of piece and tying off.
If using beading wire or similar stringing material that requires a clasp start by threading one side of the clasp to the middle of a length of material measuring double the desired finished length. Holding both ends of your stringing material together, thread beads etc. until you reach the center point of the necklace, anklet, or bracelet. Add keyboard key pendant and continue beading until just before the end of your stringing material, end off necklace as desired using a crimp bead/bead cap etc. and knotting. Connect the end of your necklace and the other half of a clasp with a jump ring.
Beaded style - Follow above directions for starting and ending jewelry piece. Do not add jump rings, instead thread keys on stringing material through both holes of each key. Add beads etc. throughout as desired.


- 3763 reads


Very nice, this would make a perfect gift for the geek in your life!

I was looking for another pic and found this - how cute is this....


Who's New


Wellington Florida
Married
That is a cool idea. I could see doing a anklet and spelling your name out