
5 Tips & Tweaks To Help Your Computer Run Faster in Windows XP
MalwareBytes is GeekDrop's Favorite Anti-Malware Solution
Act now to get a huge savings on GeekDrop's favorite Backup, Imaging, & Drive Utilities. Also our member's #1 choice!

1. Keep Only One Browser
You may have several browsers installed on your computer, Internet Explorer, Firefox, Safari, etc. You're better off to go with Mozilla Firefox. If you still want to keep Explorer you can do that from within Firefox, just download the IE Tab add-on, you can get that by clicking here. Using that you can access Internet Explorer.
 
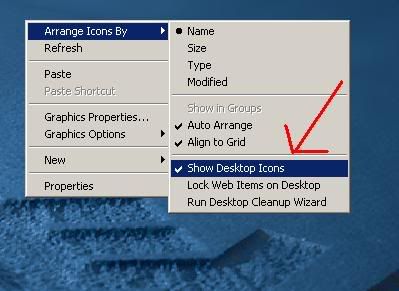
2. Disable Desktop Shortcuts
Shortcuts on your desktop are not necessary and they increase your computer startup time. There are other ways to access applications, such as through the Start Menu. To hide desktop shortcuts, right-click on your desktop, go to "Arrange Icons by" and uncheck "Show Desktop Icons" by clicking on it.
 
3. Disable Animations and Appearance to maximize performance
If you prefer performance versus appearance, click on Start, Control Panel, then System, in the System Properties window, click Advanced, then in Performance, click Settings, and click Adjust for best performance.

 
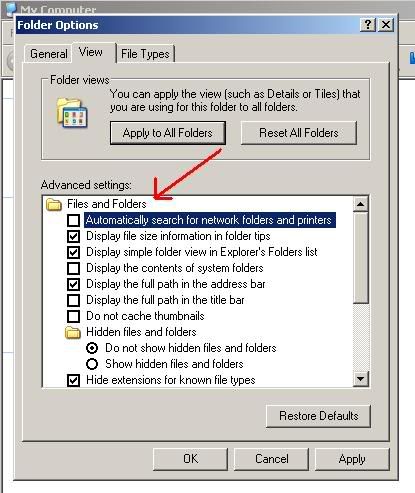
4. Slow loading My Computer window
If the My Computer Window loads slowly, go to Start, My Computer, choose View, then uncheck ‘Automatically search for network folders and printers"
 
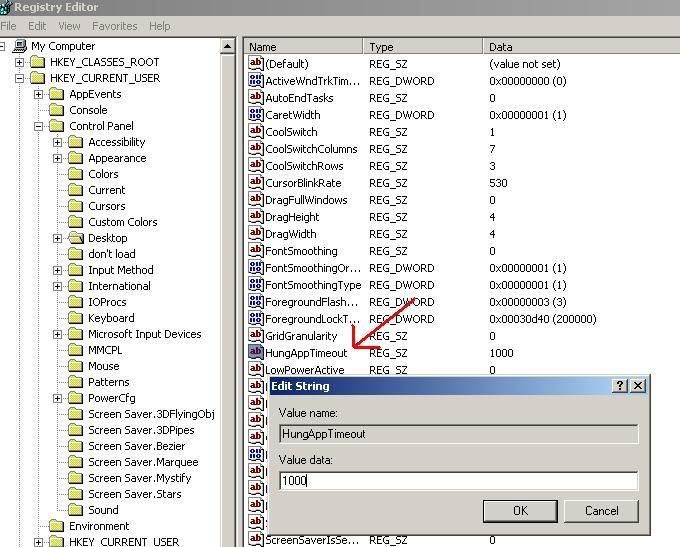
5. Increasing shutdown speed by reducing wait times
Windows XP stores some values in its registry which determine how long to wait before killing open applications and services once the shutdown command has been given. By editing the following two settings and changing them to lower values, you can decrease the amount of time that Windows XP needs to successfully shut itself down.
Click on the Start button, and choose Run
Type in regedit and navigate to HKEY_CURRENT_USER\Control Panel\Desktop\
Highlight the ‘WaitToKillAppTimeout' value.
Double click or right click on it, choose modify, and in the edit string change the value data to 1000, hit ok
  
 
Now highlight the ‘HungAppTimeout' value
Double click or right click on it, choose modify, and in the edit string change the value data to 1000, hit ok
Tip Reference: pctipsbox.com
By doing these 5 tips & tweaks, you should see increased performance on your computer. 

- 2882 reads


I'm Not trying to show anyone up but I think this should be posted in here !
This works really really really good ! I would not own another XP PC without doing this !
See Credits at bottom !
Black Viper's Top tweaks for a faster win XP PC
The following is what I do directly after a clean install of Windows XP. This does not mean that everything I do will work for you. Keeping that in mind and ensure you are fully aware of the risks of tweaking your system before doing so.
Point to note: Ensure that you are logged in as an "Administrator" or have Administrator rights before performing any of these steps.
Even though I do these steps directly after a clean install, all of them can be done at any time.
Number One: System Restore and Indexing Services
This is valid for Windows XP Home and Pro.
If you are experiencing "random" slowdowns and "high" CPU usage for no reason, these two services are the most likely cause of the problem. These services are also a major cause of "missing" disk space. System Restore Service could be taking up 3 GB of space, just on it's own.
For an easy method of creating multiple Service Configurations, please check out my Windows XP Services Profile Guide.
System Restore Service creates system snap shots or restore points for returning to at a later time. Every time you install a program or new driver, plus on a schedule, this service creates a "restore point" to roll back to if a problem occurs. This service would have been nice in the Win95 days due to plenty of problems occurring (new DirectX version every 15 minutes) but not required for the "much" more stable WinXP. This is the first thing that I get rid of on a clean installation. If you use this and enjoy it, good for you. I never will. I feel it is faster and less hassle to just install clean. A rather GOOD (and possibly the only) reason to use this "feature" is to roll back your OS after installing an unknown program or testing software. For example: BETA software of any kind or before installing Service Pack 1 or 2. NOTE: If you disable this service, your previous "restore points" will be deleted. If, for what ever reason, you do not want this to happen, do not disable this service.
Get rid of System Restore Service and Indexing Service. I disable both, plus uncheck the box, just in case it may decide to fire back up. This is valid for Windows XP Home and Pro. Where do you find it?
With the default Category Control Panel:
- Head to Start
- Select Control Panel
- Select Performance and Maintenance
- Select System
- Select System Restore Tab
- Check "Turn off System Restore"
- Select the Ok button to apply the settings
With the Classic Control Panel:
- Head to Start
- Select Control Panel
- Select System
- Select System Restore Tab
- Check "Turn off System Restore"
- Select the Ok button to apply the settings
Screen shots of the process are also available.
After that, Disable and Stop the System Restore Service:
With the default Category Control Panel:
- Head to Start
- Select Control Panel
- Select Performance and Maintenance
- Select Administrator Tools
- Select Services
- Select "System Restore Service" (Double Click)
- Select General Tab
- In the Startup type: select "Disabled"
- Select the Ok button to close the panel
With the Classic Control Panel:
- Head to Start
- Select Control Panel
- Select Administrator Tools
- Select Services
- Select "System Restore Service" (Double Click)
- Select General Tab
- In the Startup type: select "Disabled"
- Select the Ok button to close the panel
Screen shots of the process are also available.
While you are there, you can disable and stop the Indexing Service:
With the default Category Control Panel:
- Head to Start
- Select Control Panel
- Select Performance and Maintenance
- Select Administrator Tools
- Select Services
- Select "Indexing Service" (Double Click)
- Select General Tab
- In the Startup type: select "Disabled"
- Select the Ok button to close the panel
With the Classic Control Panel:
- Head to Start
- Select Control Panel
- Select Administrator Tools
- Select Services
- Select "Indexing Service" (Double Click)
- Select General Tab
- In the Startup type: select "Disabled"
- Select the Ok button to close the panel
Screen shots of the process are also available.
Number Two: Remote Assistance and Remote Desktop Sharing
Remove Remote Assistance and Remote Desktop Sharing.
Take note: Remote Desktop Sharing is not available with Windows XP Home. You may request assistance from someone only using Windows XP Pro.
Where do you find it?
With the default Category Control Panel:
- Head to Start
- Select Control Panel
- Select Performance and Maintenance
- Select System
- Select Remote Tab
- Uncheck both "Remote Assistance and Desktop Sharing" options
- Select the Ok button to apply the settings
With the Classic Control Panel:
- Head to Start
- Select Control Panel
- Select System
- Select Remote Tab
- Uncheck both "Remote Assistance and Desktop Sharing" options
- Select the Ok button to apply the settings
Screen shots of the process are also available.
Number Three: Page File
Adjust the paging file to a respectable level. This is valid for Windows XP Home and Pro.
Can you get rid of the paging file? Yes and no. If you have a boat load of memory (greater than 2GB) you may be able to function just fine. Some games require a certain amount of swap space to be created to even run, no matter how much RAM is available. Also, under certain conditions, my sound card goes crazy (or does not function) in some games with no paging file (oddly enough, Age of Empires 2). If you decide to test your luck with no paging file, you are on your own. Please do not E-Mail me with your war stories about no paging file. Every system is different and each persons requirement of how many applications are open at a time is different.. I usually do not have one "unless something requires it that I am running that day."
Where do you find it?
With the default Category Control Panel:
- Head to Start
- Select Control Panel
- Select Performance and Maintenance
- Select System
- Select Advanced Tab
- Under Performance, select the Settings button
- Select Advanced Tab
- Under Virtual Memory, select the Change button
- Adjust as needed, or select "No paging File," then select the Set button
- Select the Ok button to apply the settings
- You must reboot for the changes to take effect
With the Classic Control Panel:
- Head to Start
- Select Control Panel
- Select System
- Select Advanced Tab
- Under Performance, select the Settings button
- Select Advanced Tab
- Under Virtual Memory, select the Change button
- Adjust as needed, or select "No paging File," then select the Set button
- Select the Ok button to apply the settings
- You must reboot for the changes to take effect
Screen shots of the process are also available.
If anything, create (preferably on a separate partition), a paging of constant size. For example, select Custom Size and place 1000 in "Initial" and 1000 in "Maximum" Size boxes, then click Set Button. This will reduce the amount of work needed to dynamically resize the paging file, usually when you need it most.
Some definitions need to be explained:
Physical RAM ~ The amount of Memory (RAM) installed on a system. Physical RAM is "way" faster than a "paging file."
Paging File ~ The file that is located on your hard drive that "acts" like Physical RAM but is way slower.
Virtual Memory ~ The name used for the sum of Physical RAM and the Paging File. In other words: Physical RAM + Paging File = Virtual Memory. You cannot "disable" Virtual Memory even if you disable the Paging File. Meaning, 2 GB RAM + 0 MB Paging File = 2 GB Virtual Memory.
If you have not already, reboot now.
Number Four: Themes
Reduce the overhead associated with WinXP's new Themes. This is valid for Windows XP Home and Pro. I have observed between 4 MB to 12 MB of RAM used for the new themes.
With the default Category Control Panel:
- Head to Start
- Select Control Panel
- Select Performance and Maintenance
- Select System
- Select Advanced Tab
- Under Performance, select the Settings button
- Select Visual Effects Tab
- Select "Adjust for best performance."
- Select the Ok button
With the Classic Control Panel:
- Head to Start
- Select Control Panel
- Select System
- Select Advanced Tab
- Under Performance, select the Settings button
- Select Visual Effects Tab
- Select "Adjust for best performance."
- Select the Ok button
Screen shots of the process are also available.
After that, Disable and Stop the Themes service.
With the default Category Control Panel:
- Head to Start
- Select Control Panel
- Select Performance and Maintenance
- Select Administrator Tools
- Select Services
- Select "Themes" service (Double Click)
- Select General Tab
- In the Startup type: select "Disabled"
- Select the Ok button to close the panel
With the Classic Control Panel:
- Head to Start
- Select Control Panel
- Select Administrator Tools
- Select Services
- Select "Themes" service (Double Click)
- Select General Tab
- In the Startup type: select "Disabled"
- Select the Ok button to close the panel
Screen shots of the process are also available.
Number Five: Services
Adjust for any additional unneeded services. This is valid for Windows XP Home and Pro. Windows XP Services.
For an easy method of creating multiple Service Configurations, please check out my Windows XP Services Profile Guide.
If you have not already, reboot now.
If you have rebooted, do it again.
Number Six: Add/Remove Programs
This is valid for Windows XP Home and Pro. Go to the "Add Remove Programs" and click the "Windows components." Here, take out all the crap you do not need. Such as "MSN EXPLORER" and such.
After Removing the unused Windows components, ensure that you check back up on the services that you disabled. Some like to go back to Automatic after playing with the Windows components (namely COM+ and Help and Support).
You may also adjust a file to "allow" you to remove other Windows components, such as MSN Messenger. Here is how:
TAKE NOTE: You will need to enable "hidden file" viewing to see the inf files.
IF YOU ARE SCARED, DO NOT MODIFY THE FILE... Also, you may experience a delay of around 30 seconds or more when loading up Outlook before you can do anything. Putting Messenger back will allow Outlook to function properly again. If you use MSN Explorer, Messenger will also be running in the background. It is how Bill is getting to the ".NET" stuff. "Software as a service" is coming soon.
Go to your Windows\inf folder. The default is ~ c:\windows\inf
edit the file called "sysoc.inf"
Remove the reference of "hide" in this line:
msmsgs=msgrocm.dll,OcEntry,msmsgs.inf,hide,7
To make it look like this:
msmsgs=msgrocm.dll,OcEntry,msmsgs.inf,,7
You may also remove all references to "hide" in all of the other lines as long as you KEEP the commas. Some components you cannot "uncheck" in the add/remove programs GUI. If you do get them to uninstall, I do NOT support it. You are on your own.
Number Seven: Drivers!
This is valid for Windows XP Home and Pro. Download and install ALL updated drivers from the hardware manufacture sites. I cannot tell you what site you need to go to, but do your computer a favor and get updated drivers for everything.
Reboot again.
Number Eight: System Tray
After updating all my drivers, I remove any excess icons (all of them, basically) from the system tray (lower right) and recheck the services to ensure nothing else was installed (like NVIDIA's "driver helper." Contrary to popular belief, those little "quick access" icons take up a lot of room.
For example, MS messenger takes up about 3.6 MB just sitting there... not even logged in... Bring it up, select tools, options, then uncheck "load at startup" and uncheck "allow to run in background."
Also, Creatives "AudioHQ" running is REALLY not required.
Turning off "AudioHQ" |
 |
| Uncheck "Load on Startup" and "Show icon on Taskbar" in AudioHQ's Options menu. |
ICQ's little "Net Detect" sucks up way too much memory. Make it go away. Various Quick Tweak icons and even EZCD creator's icon annoys the hell out of me. Make them all go away. If you just gotta have that quick access to those programs, place them in the "quick launch bar" (located in the lower left by default, where IE and "Show Desktop" buttons are). The icons will not clutter your desktop and you can easily hit them from any normal windows application. To top it all off, they do not take up memory or resources constantly running in the background. Another plus, this will reduce your boot up time.
Number Nine: msconfig
I run msconfig and get rid of any annoying startup programs that may be hiding from me. If you are not familiar with the operation and features of msconfig, I am not going to go into them here. Do not adjust your service configurations using msconfig, though.
To use msconfig:
- Head to Start
- Select Run
- Type "msconfig" without the quotes
- Select OK or hit Enter
Number Ten: Defrag
Defrag the hard drive. Even if XP tells you that it does not need to, do it anyway. It has much tolerance for what "needs" to be done and what should be done. After all, if it was really efficient, there would be no need for you to read this page.
Defrag again after installing your applications and games. After that, there should be little need to do it again for awhile unless you delete/uninstall/reinstall a lot of stuff.
This listing is by no means complete, but it does hit on the high points.
Credit goes to BlackViper visit the site where I got this from below.
http://www.blackviper.com/WinXP/supertweaks.htm
they now have the tweaks for vista up
http://www.blackviper.com/WinVista/supertweaks.htm
Who's New


Wellington Florida
Married
Great tips missb! I know some of my office pc's are on XP and getting a little on the older side. I've had to use some of these tips to speed them along and they work.